Pages

Monday, September 28, 2009

My Pretty Letter Tray


I need an overwhelming amount of paper-sized stuff (printer paper, card stock, felt) for all my crafts and craft kits. Trying to keep it organized is really, really hard work. Especially when my kids try to steal the fifth shade down in the mountainous pile of orange card stock.
Really, child? You can't use a light orange piece of card stock that's on the very top of the pile? No? Your jack-o-lantern requires the shade of orange that will inevitably cause a paper cut avalanche when you pull it out? Awesome.

Really, I don't care about that. What it comes down to is this: I freakin' LOVE containers.

So a few months ago my local Red Cross advertised an office supply giveaway on Freecycle. And you know how I love The Free. It was supposed to start at 8:00 a.m. I got there at 7:55 a.m. and no joke, there were about two things left. Some people really like free stuff and they really don't feel the need to follow the rules. Follow the rules, people! 8:00! Dang!

Anyway, they were giving away this hideous HIDEOUS! metal letter tray. I looked at this ugly thing and visions of paint and Mod Podge danced in my head. And I might have fantasized just a little about the organization that would follow after I prettied it. So I grabbed it and held it in my loving arms as fast as I could. As if I believed someone else would want it. No one wanted it. No one! Sad, sad, little paper tray.

"I will conquer you, Ugly!"


Anything that is hideous and made of metal needs Spray Paint! Right away! So James painted it white for me (Thanks, Honey!):


It's almost as if your eyes can rest a little easier now, isn't it?

And then I went to JoAnn's Fabric Store and found this paper:


And I cut it up and Mod Podged it on the sides of my letter tray:


And then I Tacky Glued on some pretty brown ribbon:


And with all my other paper containers, you can't really see it, but I love it anyway.


It just makes me happy. Because I'm totally the person who throws my body to the floor and rolls around like a dog in absolute heaven after the carpet has been professionally cleaned. Same kind of thing. I go downstairs for no other reason than to gaze at the organizational beauty.


And it matches my file cabinet and my bulletin board. I love it!

Thursday, September 24, 2009

Penne with Corn, Roasted Poblanos, Avocado and Tomato

When James wants husband bonus points, he has many, many options. But one of my favorites is when he comes home from the store armed with a bottle of wine and a cooking magazine. I could spend hours drinking wine. I mean, I looking through recipes. Whatever. It's therapeutic.

A long time ago James brought home a Cooking Light magazine and I've been making this recipe ever since. It's an interesting take on pasta because many of the ingredients are raw when you put it all together. And the poblanos and onions can make it a little spicy. So good!

It calls for queso fresco, which I never have, so I always use some sort of grated cheese. And sometimes we go without the avocado. Because, on matter of principle, I refuse to spend more than $1.50 on an avocado. Seriously! When I see an avocado for $2.00 it brings out my anger issues. And I usually just thaw some frozen corn kernels instead of roasting fresh, because in some aspects of cooking I'm just lazy. I use this recipe as a main dish, but you can also serve it alongside grilled chicken or steak if you want to be fancy. Sliced blackened chicken on top would be great, too.

And because I'm very proud, please notice the Fresh From My Garden Cherry Tomatoes in the picture! I love my little garden!


Here's the recipe, courtesy of Cooking Light Magazine:

Penne with Corn, Roasted Poblanos, Avocado, and Tomato

2 poblano peppers
2 red bell peppers
2 ears shucked corn
2 T. lime juice
1 T. extra virgin olive oil
1 t. salt
1 t. black pepper
1 t. ground cumin
1 garlic clove, minced
16 oz.
penne pasta
2 cups halved grape tomatoes
1 cup chopped onion
1/4 cup chopped fresh cilantro
1 chopped peeled avocado
3/4 cup
queso fresco or other grated cheese

Preheat broiler.

Cut poblano and bell peppers in half lengthwise; discard seeds and membranes. Place pepper halves, skin sides up, on a foil-lined baking sheet; flatten with hand. Add corn to baking sheet. Broil 18 minutes or until peppers are blackened and corn is lightly browned, turning occasionally. Place peppers in a ziplock plastic bag; seal. Let stand 10 minutes. Peel and chop. Cut kernels from ears of corn.

Cook penne according to package directions.

Combine juice, oil, salt, black pepper, cumin, and garlic in a large bowl; stir. Add peppers, corn, pasta, and remaining ingredients except cheese; toss. Top with cheese.

Serves 4.

Enjoy!

Sunday, September 20, 2009

Mini Mummy Kid Kit


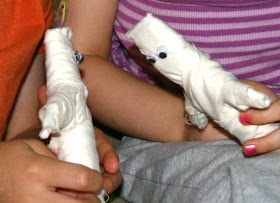
This Mini Mummy Kid Kit is the first craft kit I've made that is for kids AND adults. I love these mummies. They are really easy to make and so adorable! And, unlike real mummies, they won't try to eat your brain. Bonus!

Peyton and Ella love the mummies that they made:


Apparently, their mummies are a mommy and a daddy, and they talk like this:
"Hi! I'm Mommy!"
"Hi! I'm Daddy!"
"Do you want to go to the store?"
"Yeah! Let's go!"


We lead such interesting lives around here. It must be very inspiring to the mummies. You know, way more interesting than slowly chasing humans around while making the "uhhhhhhh...." sound.


Behind the Crafting (It's like Behind the Music, but way cooler):


You should have seen me working on the mummy "set." It took me an hour to put it all together. I really wanted a spooky background, but I didn't have anything little enough to fit the scene. Since the mummies are only about 7 inches tall, I had to do some constructing and set decorating on my own. I made the coffin with some leftover flowered scrapbook paper, sharpie marker and tape. I strung up the spiderwebs with tape that I attached to my filing cabinet and a plastic chair that I perched atop my treadmill. Watch out for the dinosaur! What a glamorous life I lead.


I know, I should totally use this as my entrance form to Design Star. "Yeah, I can design, check out my blog!"

Anyway...


Happy Crafting!


Wednesday, September 16, 2009

Kindergarten Field Trip

Peyton had his first Kindergarten Field Trip this week. I was thrilled that I was able to go with him and his class.

I don't think it would have mattered to Peyton if all we did was get on the school bus and drive around the block a few times. Seriously, he loves buses THAT MUCH.

But instead we actually went somewhere - a beautiful nature park. And we had a nature guide who led us all on a "Discovery Walk." Basically, we walked around and the kids found stuff and our guide taught them about their discoveries. It was really fun!

We traveled through prairies and woodlands:


And through fields of flowers:


We saw beautiful Monarchs:


And we found Soldier Beetles (Do you see it? it's yellow):


And baby Soldier Beetles:


And a little tiny Goldfinch nest (our state bird, and I know you are totally dazzled by my knowledge):


And an Argiope Spider (people who obviously lie told me that it's a type of garden spider and that it is completely harmless to humans. C'mon! Look at it! I know it would kill me in 2 seconds flat if given the chance):


And we found walnuts (in the husk, and I know my knowledge is now overwhelming you):


Our guide led us to this tree that had died and had to be cut down. She said it had covered that entire grassy area when it was alive:


It was covered with climbing and jumping children within milliseconds of being discovered:


See those trees? We were just in there! So neat!


After we got back to school, Peyton wanted me to stay for lunch. I won't even pretend that my heart didn't sing a little when he asked me. I love this kid so much!


Happy day!


Friday, September 11, 2009

Picture Perfect Switchplate

You know how kids LOVE to see pictures of themselves? I have to give my husband credit for this one. He came up with the idea to decorate Peyton's switchplate with a picture of Peyton "surfing." Peyton loved it! Originally James glued on the picture, but after a while it started to get ripped up and sad-looking, so I Mod-Podged on a new picture for better staying power.


I just think it looks so cool! Want to make one, too?

What you will need:
Wax Paper
Switchplate
Picture
Scissors
Mod Podge
Foam Sponge Brush
X-Acto Knife


Cover your work area with wax paper.

Figure out how you want your picture lined up on the switchplate. You probably want to make sure you aren't cutting out the middle of your kid's face to make the light switch hole. I'm just assuming.

Cut the picture to size, adding about half an inch to each side:


Use the foam sponge brush to Mod Podge your picture onto the switchplate, wrapping the sides of the picture around to the back. Make sure to smooth out any bubbles. I used my X-Acto knife to cut a small diagonal slice in each corner to make it easier to wrap the picture around the switchplate:


Oh wait, that's not it! Someone stole my camera to take a picture of her 3-year-old hand. Here you go:


Ella took that last picture, too. I know. She's awesome.

Turn your switchplate onto its face and use the X-Acto knife to cut an X where the light switch will be. Then turn the plate back over, fold in the cut pieces, and Mod Podge them into place.

Let your switch plate dry completely. Cover with another layer or two of Mod Podge and let dry. I colored the screws with Sharpie markers to make them match a little better:


Happy Crafting!


Tuesday, September 1, 2009

At Which Point I Decided...


I would not be going outside for any reason, no matter what, for the rest of the day.

I'm sure the Bug People are all, "What a beautiful specimen of blah blah blah." / "Ichneumon Wasps are parasitic on other insects, so they are good to have in the garden blah blah blah."

I mean, C'MON! There is no reason for an insect like this to exist.

And I'm not the only one. Check out what THE Charles Darwin said: "I cannot persuade myself that a beneficent and omnipotent God would have designedly created the Ichneumonidae with the express intention of their feeding within the living bodies of Caterpillars, or that a cat should play with mice."

My translation: They are just NOT RIGHT.

And I know you are totally impressed that I have Darwin to back me up on this one. Take THAT Bug Lovers! DARWIN! MY SIDE!

And Bug People, don't even TRY to fool me with, "That's not a stinger, it's an ovipositor. It's how the female lays the eggs." BECAUSE I KNOW! I KNOW THE TRUTH! It's not only a stinger, it most definitely expands to wrap itself around my neck before it sticks me REPEATEDLY with the end. IN THE NECK. And then for dessert it goes for my eyeballs. And then I die. And I'm dead. Thanks, Iowa. And thank you, Nature. You are both jackasses.

Dear Iowa,
Your bugs suck.
Without love,
Darcy

What's that? You really want to see Just One More picture at a slightly different angle? Here you go:


Dear Bug,
You're stupid. And you're dumb. Really, really lame. So lame that I'm making the L sign on my forehead even though I haven't done that since, um, ever. That's how lame you are. La-AME. And now I present this last one in song, "
Laaaaaammmme!"
No love here,
Darcy

I could try to reassure you, internet friend who totally understands me, by maybe saying that this wasp on my sliding glass door was really, really, really small and I used a super-power zoom lens. BUT IT WASN'T and I DIDN'T. The thing was like 4 inches long. I'M NOT JOKING. Sweet dreams.


Dear Fireflies,
I still love you. You are the coolest bug EVER!
Love,
Darcy