Pages

Tuesday, December 11, 2012

Holiday EyeBot Box Craft Kit

So... EyeBots.

You never knew you needed them, I'm sure, but could you really ever live without them after seeing this...


And this...


And, hey! Why not? This...


Exactly.

And if that all that EyeBot adorableness isn't enough, check this out...


THE THING IS A BOX! I know! It's awesome. 

Just imagine all the sweet treasures your little one will keep safe and sound in there. 

(True story: I recently had a table at a local Holiday Boutique. A little boy came along and was looking at all the craft kits and samples I had set up. He had some money to spend and was planning on buying himself a craft kit. I picked up the sample EyeBot that he had been eyeing, and opened it up to show him it was a box. His eyes LIT UP! It was fantastic. The kit makes two EyeBots? Perfect, because this little sweetie wants to make one for his 1-year-old sister's room, too. My heart just about melted.)

So here's the situation! This craft kit makes 2 awesome little EyeBots - Minion-style AND Robot-style - so you can make one of each style or two of the same. And it comes with paint and paper and craft foam and lots of mix-and-match decorations. 


And look how cute the packaging is!


Want to know EXACTLY what comes in the kit?  Just look on the back of the box!  I know! There's a lot of crafty goodness in there!


Happy Holiday Crafting!


Wednesday, November 21, 2012

Art Wall!

So I had this idea that I wanted to make a big gallery-style wall of my kids' artwork.

I started by spray painting a bunch of frames white. I had them already, and they are kind of mismatched in style, but that's the way I like it. I like how the white unifies the entire situation. What I don't like is how, whenever I think about the word Situation, I think of Jersey Shore, and I've never even seen that show. It's bothersome, really.

Oh! Hey! Want to know how many holes are behind each and every frame in my house? I'm going to take a guess and say there are at least a good, solid, five holes behind each one. And, yes, I know how some people lay their pictures out on the floor first or do that paper taped to the wall thing so that they don't have five holes per frame. I envy those people. I am not those people.

I wanted to have some pieces of art that I would keep in the frames for a very long time and some that I could change out with the seasons. Which is a ridiculously lofty goal.

True story: When Peyton and Ella were very, very little I framed two pieces of their artwork for each of their rooms. "How cute this will be!" I thought. They will be glorious, fresh, mini art displays! I will switch out the old art as they make new art and it will all just be so lovely and I will be the best, most decoratively-saavy mom ever. Is that even a THING? It doesn't matter, because do you know how many times I switched out their artwork? In a two year period?  Zero.

Anyway! So, the two big orange leaves will be switched out (HA!), as will the little Halloween pictures in the big white frame (HA! HA!). It should be a Smart-Bottom Enterprises drinking game. Every time that crazy-ass crack-head Darcy thinks she can ever ever ever stay on top of things, we all drink! Wish me luck. And, yes, I KNOW it's already the end of November and mini pumpkins and ghosts and witches probably belong in October. I'M WORKING ON IT.


The only things up there that are not made by my kids are the silhouettes. Ella's teacher made the one of Ella last year. Can you imagine cutting out 30+ of these suckers for an entire kindergarten class? I could barely do ONE.


Anyway, I loved Ella's so much that I made the one for Peyton. It took me three tries, and by the time I was finished I was seeing rainbowed unicorns jumping across my living room, but it was totally worth it.

There are lots of great silhouette tutorials out there, but here's what I did:
I took a picture of Peyton standing sideways.
Then I contrasted it as much as I could on my computer and printed it out in black and white.
I cut that out with an X-Acto knife, then I put it on top of black card stock to use as a template.
I cut out the black card stock with the X-Acto knife.
Then I backed it with white paper and then with Peyton's favorite color, blue. I backed Ella's with purple, because that's her favorite.
The burlap looking stuff behind the silhouettes is actually paper. Cool, right?


Some of the art pieces were already on perfect pieces of paper, like Ella's portrait of Penny down there (and Peyton's rocket and surfboards drawing). Other things, like Ella's robot (and the big orange leaves) were already cut out, so I stuck them on white card stock. And Ella's painting of our family on the swings (it says 2021 because she was trying to date it 2012), she painted especially for this art wall on a canvas I already had.


When I was taking out the glass to spray paint all the frames white, the glass on the largest frame broke. Or, rather, the little clips in the back (that hold the glass in place) were really hard to bend, and I was getting irritated, so thought that maybe I could just wiggle the glass out. Hey! Guess what? I couldn't. 

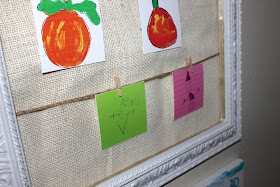
So, I hung some jute twine across the back and taped it in place with blue painter's tape. Then I hot glued on some burlap (the real kind this time, not paper). Then I clipped on little, tiny clothespins, thinking it would be easier to switch out art this way. (DRINK!) 

What's that? Are you noticing the pretty gold ribbon that I painstakingly glued to the inside of the frame? Because I'm so into detail? Are you also noticing that I didn't take the time to iron the folds out of the burlap? Because sometimes I'm not so into detail? Yeah, that also happened.


These little art pieces, as well as the small black and white house and leaf, were originally much, much larger. That little pumpkin on the left started off a good 18" high. I took pictures of the originals and printed them up small enough to fit where I wanted them. Easy!


I cannot tell you how happy this wall makes me. I LOVE how bright and colorful it is. I LOVE seeing my babies' artwork every day. And I LOVE seeing their sweet, sweet silhouettes. 


Art wall!

(and....DRINK!)


Friday, November 2, 2012

Roasted Vegetable Quesadillas

When I worked at Cheesecake Factory a zillion years ago, I tried every single item on their 40 page menu. And, yes, it was all delicious. 

One of my favorites, though, was their Roasted Vegetable Quesadilla. It's one of those dishes that messed with my head a little. I mean, it's a quesadilla, but then it has smoky gouda cheese and roasted vegetables. So, it's a little different. But then! You drizzle ancho-chile mayo and bbq sauce on the top and oh, man! It's a crazy combination of flavors. Trust me, I really don't even like mayonnaise. But here it just works. It does!

Roasted vegetable quesadillas are really, really good. And really, really easy to make at home. You should probably make them. No pressure or anything, but you probably should.

I don't remember where I originally found this recipe, and I'm pretty sure I changed it a little over the years, but it's very close to the quesadillas they used to serve at the ol' CCF. I hope you like them!


Roasted Vegetable Quesadillas

Quesadillas:
4 8-inch flour tortillas
4 oz can of diced green chiles
1 eggplant, diced
1 zucchini, diced
1 red bell pepper, diced  
1/2 red onion, diced (I skipped it on this one)
8 oz mushrooms, sliced (not in CCF's recipe at all - but really good)
8 oz Gouda cheese, grated
1 T olive oil

Toppings:
Ancho-chile sauce
BBQ sauce (any kind)

Garnishes:
Guacamole
Salsa
Sour Cream

Ancho-Chili Sauce:
1/2 cup mayonnaise
2 T sour cream
1/2 ancho-chili, minced
1 t white vinegar
1 t granulated sugar
1 t paprika
1 t garlic powder
1 t onion powder
Pinch salt

Combine in a small bowl. Cover and chill.

Make the quesadillas:
Arrange vegetables on a baking sheet (lined with foil for easy clean up). Toss in olive oil and sprinkle with salt and pepper. Bake at 450 degrees for 10-15 minutes or until tender.


Lay two tortillas on cutting board. Place an equal amount of cheese over each tortilla. Be sure to leave a 1/2-inch open border around the edge of the tortilla so the cheese doesn’t drip out while cooking.


Sprinkle equal amounts of chiles, eggplant, zucchini, roasted pepper, red onions, and mushrooms evenly over each tortilla.


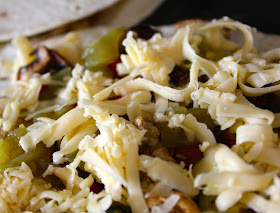
Sprinkle on more Gouda, because, really, why wouldn't you?

mmm.... Goooouda...


Cover with a second tortilla and place onto a lightly oiled nonstick skillet. Cook over medium-high heat until the tortillas have turned a crispy golden brown and the cheese has melted.


Remove them from the skillet and place onto the cutting board. Cut in quarters.


Drizzle the ancho-chile sauce and bbq sauce over the quesadilla. I do mine in a spiral, because I think it's fannnnncy! Oh! You've probably heard this trick before, but just in case you haven't, pour the ancho-chile sauce in a ziplock, seal it, cut a little tiny corner off the bottom, and squeeze the sauce out through the hole. If you want it fancy. Or you can smear it all over the top with a spoon, whatever makes you happy.


Serve with guacamole, salsa, and sour cream. 


Enjoy!


Saturday, October 20, 2012

Spooky Banner Craft Kit

It's a new Halloween Spooky Banner! I don't think I've ever had a banner with so many different things going on at once...


We have a boy Jack-O'-Lantern, Bride of Frankenstein, Skull and Crossbones (this one happens to be a girl, but you can make a boy as well), 


A Ghostie, Frankenstein's Monster, And Candy Corn (it's spooky because it will rot your teeth! Ha!)...


And a Spider (okay, this one's also a girl - I can't help it! - girls are more fun to accessorize - but any of these can be made into boys), a Mummy, and a girl Jack-O'-Lantern...


And a Witch, and a Bat, and Dracula!


I KNOW! It's a lot. Are you overwhelmed with all the possibilities? 

Well. It gets better. 

Each little scrapbook paper decoration you see - Pumpkin stems, Bride of Frankenstein's hair, Frankenstein's Monster's hair, Dracula's hair, Witch's hat and hat band, Spider legs, Skull and Crossbones' bones, and Bat wings - comes in 3 different paper variations in the kit. So, not only are there lots and lots of paper choices, if you decide you want to skip the Skull and Crossbones and Bat and make 3 spooky Spiders instead, go for it! The paper supplies are there. And they are awesome.

And then. It gets even better.

This kit has tons of decorative ribbon (I mean, I didn't actually weigh it, but I'm pretty sure it's about a ton), and crushed tulle for the Ghost...


And muslin Mummy wrap, orange flowers, hand-punched rosy cheeks and eyelashes and curls and ghost eyes (I hand-punched each and every one!)... 


And wiggly eyes and colorful sequins and black buttons! Oh, and I even include a pencil so your little one(s) can draw sweet or spooky little mouths onto the faces. It does not get any cuter than child-drawn mouths!


Oooooh.....Spoooooooky!

And it all comes packaged in a cute little box...


Happy Halloween Crafting!


Thursday, October 11, 2012

3D Hand Drawings

I saw this cool 3D Illusion Hand Drawing on pinterest. The actual pin doesn't even have written directions, just step by step pictures, but don't worry, that's all you'll need! 

So my kids and I sat down with some paper, a pencil, and some markers and got to work.

It was awesome. And by IT, I mean the quiet that consumed the dining room as my kids worked for a good half hour creating their 3D hand drawings. The hand art turned out great, sure, whatever, but it was The Quiet that was MAGNIFICENT. And, therefore, I strongly recommend this art project.

Peyton is 8. He ran out of steam before he could color the bottom two rows, but still it looks pretty darn cool.


Ella is 6. She colored her fingers different colors, "So they'll stand out more!" Geez. Maybe it's not as strong of a 3D effect, but we'll pretend it is anyway because we love her. For only being 6 years old, I'm still pretty impressed.

Both Peyton and Ella LOVE their 3D hands. They are totally proud and amazed at what they accomplished. It was a simple project with only few supplies and no mess at all. And the QUIET! Did I mention the quiet?

This next one is mine. I think it looks so cool! 

Art project success!

Tuesday, October 2, 2012

I'm Back!

A little bit. I'm trying to back into the swing of my blog. I know I was never really in full-force before. I mean, c'mon! Once a week blogging? It's for blogging wimps.

I am a blogging wimp.

I love my blog, I love sharing things with you, and I LOVE reading your comments, but sometimes blogging is a little bit of a labor of love. I kind of enjoyed my summer off. I may do it again. Watch out!

Anyway! Let me start off with a super short post about what we've been doing a lot of lately:


Which is, mostly, laying around this house in different places, trying to find the coolest place possible in this UN-RE-LENTING HEAT.

Because we moved! Yay! But we have no air conditioning! Boooo!

Today was ONE HUNDRED. AND THREE. Because just one hundred degrees is just not enough. So nature threw in an extra bonus three degrees. Damn you, nature.

Anyway, Penny has found her perfect spot. On the cool stone next to Norman the Meditating Gnome. I may kick her off soon because that most definitely looks cooler than my place on the couch.

Tomorrow is only supposed to be 94 degrees. Don't be jealous.

Saturday, August 4, 2012

Stained-Glass Butterfly Craft Kit

My Stained-Glass Butterfly Craft Kit got revamped! Oh, the colorful sparkliness of it all!


So now the craft kit makes even more butterflies! It contains supplies to create FIVE butterflies with lots of mix and match decorations - colorful tissue paper for the wings, preprinted decorative paper butterfly bodies, iridescent chenille stem antennae, and lots of sparkly sequins!


I'm pretty proud of that rainbow butterfly. I ripped the tissue paper into long strips and just went for it. Then I matched the sequins going down his body so he's extra, extra rainbow-y. I love him so much that I made him my etsy shop avatar. And then I was inspired to change my shop banner, too. Go look! He's my own little fluttering muse. 


Ready for some behind-the-scenes glamour? Now, I'm not a professional photographer. But I'm pretty sure any professional photographer would have taken the butterfly pictures EXACTLY like I did.  

Which is by lying on my back on the dirty cement while giggly, squirmy kids held a backless, glass-is-taped-to-the-wood-and-it-might-fall-out-and-shatter-at-any-moment frame above my head so I could take pictures.

They could not, for the life of them, hold that frame level.

Do you see what I go through? It's a very dangerous line of work I'm in. 

Oh, look! That kid there thinks holding the frame with his 8 year old thumbs is perfectly safe.

I could not get out from under there fast enough.


But anyway!

Big news! I've changed my craft kit packaging! Slowly but surely, I'm going to be switching over from the bags to these extra fancy looking things:


I loved the bags, but boxes are much more sturdy. 
It also might have something to do with the fact that when I had a booth at an outdoor craft fair recently, the craft kit bags kept blowing over and it was really driving me bananas. BANANAS! I just don't need any extra crazy in my life.

And, seriously, this box is a gift giver's dream! It's colorful and pretty enough to give as is, or you could easily wrap it up in decorative paper, or you could just slap a bow on the top and call it a day.

Anyway. Look how cute the back is! Why, yes, I do feel a little extra professional right about now.


Did you notice how the rainbow-colored blocks on the packaging match the banner in my etsy shop? I'm pretty excited about all the changes going on around here.

The butterflies look best taped to a window, but you could also hang them up on your child's wall, like so...


Or go for a simple framed look...


Cute! Cute! 


Happy crafting!