Pages

Tuesday, January 31, 2012

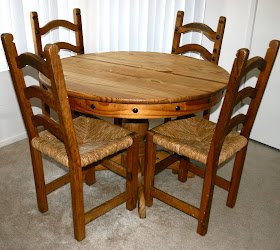
Fancying Up the Dining Table

So we've had this table FOR.EV.ER. It's still super sturdy and functional, but it has rust stains and kid paint and lots of chew marks where our dog Max decided it needed some extra visual texture. This table has history!

But although we want to get a new dining room table - a big fat rectangular monstrosity is what we really want - the dining area in our apartment is small and our little round table fits in perfectly.

So we decided to do something about the look of it.


Look! Nipple-shaped decorative nails! Yay. I was able to pop those suckers right out.


Look! More nipple embellishments! The ones on the chairs are there for the long haul. There was absolutely no way to get them out. I tried! Oh, how I tried!


Lots and lots of stains to prove how our table has been loved over the years.


Out, out, damned spot! We sanded and painted...


And stained and polyurethaned...


But then the chairs were much too white, so I distressed the paint and picked up some colorful chair cushions (they were on clearance at Pier One for only $5 each!).

Look at us now!


Happy, happy table.


Tuesday, January 24, 2012

Walnut and Dried Cherry Bars

So we're going to be eating a little more healthful over here. We definitely weren't bad before, but I'm upping the ante this year. As in, I bought my first box of quinoa. I have no idea what to do with it quite yet, but it's there, in the pantry, staring at me every single day. That ought to count for something.

Anyway. If you're looking for a super sweet cookie bar, feel free to walk away now. This is not that type of bar. 

This kind of bar is a cross between a chewy, nutty granola bar and a sweet and tart and dense breakfast bar. They definitely have a healthful vibe, but Oh My Yuminess, I love them! The original recipe is from Ellie Krieger, it's over here, but I changed it up a bit, and I also added mini chocolate chips, and extra nuts, and extra fruit preserves, sooooo... you know they're gonna be scrumptious! To compensate for adding all that extra not-perfectly-good-for-you-stuff, I omitted the oil she uses and added more applesauce, so I'm pretty sure it all evens out. Yep. Pretty sure.

I really like the recipe in general because you can totally make it your own - choose your dried fruit, your nut, your all-fruit spread - no matter what, it's going to be great!


Oh, I usually double the recipe below because they go fast in our house! My husband and I can't stop eating them. And they are really delicious with a hot cup of tea.


Walnut and Dried Cherry Bars


Ingredients:

1 cup oats (quick-cooking or regular)
3/4 cup whole wheat flour
1/4 cup toasted wheat germ (or you can skip it and add 1/4 cup more whole wheat flour)
1 teaspoon ground cinnamon
1/4 teaspoon salt
1 teaspoon vanilla
1/2 cup honey (or maple syrup if you run out like I sometimes do)
1 cup unsweetened applesauce
1 egg, beaten 
1 egg white (when I double the recipe, I just use 3 whole eggs total and it works out fine)
1 cup chopped dried tart cherries (or any other dried fruit)
1 cup chopped walnuts (or any other nut)
1 cup mini chocolate chips (optional)
Cooking Spray
1 cup "all-fruit" apricot preserves (or any other preserves)


Make It:

Preheat oven to 350 degrees. In a large bowl, whisk together the oats, flour, wheat germ, cinnamon, and salt.

In another bowl, whisk together the vanilla, honey, applesauce, and eggs. Stir into the oatmeal mixture until well combined. Add the cherries and walnuts and chocolate chips.

Coat an 8-inch square baking pan with cooking spray. Spread the mixture into the prepared pan and bake until a toothpick inserted in the center comes out clean, about 30-35 minutes. 

Put the preserves in a small saucepan and bring to a boil. As soon as the bars come out of the oven, brush with the preserves. Cool completely and cut into squares or bars.


Happy and Healthy Eating!


Tuesday, January 17, 2012

3 Things

1. New Blog Header

Did you notice? Did ya? Did ya? I did it all by myself!!! I used this awesome tutorial (just liked I used to make this header) and it was really easy! I find myself checking my blog just to look at its beauty and happy colorfulness.


2. Rainbow Cake

Do you remember when I first made a Rainbow Cake and it totally rocked it out?

The holiday season is crazy for everyone, of course, but it's a little extra crazy for us because Peyton's birthday is December 17th (he turned 8) and Ella's birthday is January 9th (she turned 6). Oh, and our wedding anniversary is December 15th (we made it 10 years!), but that's beside the point.

The point being: Rainbow Cakes are awesome!

Usually we do cupcakes for our birthday parties because they're so easy, but ever since The Rainbow Cake came into our lives, things have changed for the better. Peyton wanted a rainbow cake for his party, Ella wanted a rainbow cake for her party, and we were Rainbow Caking it up all over the place this winter!

The best part ever is when you cut into the otherwise-normal-looking-cake and suddenly everyone realizes that there's something special going on in there. Oh man! Kids are amazed, parents are amazed, it's all kinds of awesome. And I loved watching my kids bask in the glory when their friends saw the uniqueness of the cakes. Peyton and Ella LIT UP when they got to tell everyone how they picked their own colors. I loved that!

But really, what I wanted to do here was to peer pressure you into making a Rainbow Cake of your own. And this is why: No matter how imperfect your Rainbow Cake is, people will still think you are a Rainbow Caking Rockstar.

Example 1 - My first Rainbow Cake - Didn't even have enough frosting to cover all the sides. See all that side-cake sticking out? Didn't matter - Rockstar! (When I said side-cake did you think of side-boob? Admit it - you totally did!)


Example 2 - Peyton's Rainbow Cake:


Not even a real Rainbow Cake. He wanted blue and green stripes. Look at how uneven the frosting layers are - fail! Doesn't matter - as soon as the party kids saw the inside...


Rockstar!


You'll notice these pictures are a little messier than my First Rainbow Cake. It's one thing to carefully slice a cake when you're at home. You can make your family wait on the sidelines for five minutes while you get a good photo. It's a completely different situation when bunches of loud and crazy party kids are sitting around a table at a bowling alley or Chuck E. Cheese's waiting impatiently for their fair share of sugar intake.

Example 3 - Ella's Rainbow Cake


She chose her colors, too, and she wanted them in a very specific order. Look at that huge layer of frosting in between the purple and blue layers - fail! I didn't actually cut this one, the host from our Chuck E. Cheese party did. As soon as she cut into it, she said, "Whoa! Is this rainbow striped!?! Cool!" And you know she cuts into all sorts of homemade cakes for a living, soooo...


Rockstar!


What I'm saying is this: I'm not a baker, I've made lots and lots of Rainbow Cake mistakes, but it doesn't matter!

So, go! Go forth and make a Rainbow Cake! If I can do it - ANYONE CAN DO IT!


3. Family Portrait

Yesterday, I gave Ella a canvas, some paint, and paintbrushes. She grabbed some paper craft hearts that I was working on and some glue. Then she disappeared for a while to create her masterpiece.


She's obviously very talented - I mean, C'MON with the mixed media fantasticalness! - but just in case you have a hard time recognizing us, from left to right we have: Peyton, Ella, Mommy, and Daddy.


Seriously, I love it so much!!! Drawing with actual paintbrushes rather than markers or crayons is difficult - I think it's pretty impressive for a just-turned-6-year-old!

I framed it and put it on our Valentine's Day mantel and I'm going to keep it forever and ever.


Happy Valentine's Day decorating!

Tuesday, January 10, 2012

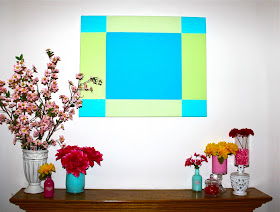
Spring Canvas - Valentine's Day Style

So when I took down our Christmas decorations, it was all house-naked up in here. Especially the mantel. Sad, naked, naked, mantel.

But! I had an idea that I wanted to paint a canvas that I could use as a simple backdrop for some Valentine's Day and Easter decorations, soooooo.....

I armed myself with a Michael's coupon and headed on over to my home away from home. I picked out a large     24 x 30 inch canvas, brought it home, and then proceeded to get completely overwhelmed by the blankness of the thing. It's what I do. Every. Single. Time.

Then I put my big girl panties on.

And then I did a little measuring and taping.


And then I painted.


And then I moved the tape and painted some more.


I kept moving the tape and painting. Each block needed two or three coats of paint. And, because I'm me, I changed the color just a little bit every time I added more paint. So, no, it's not the picture quality changing the color. That would be me. And then I wasn't paying enough attention and I messed up the taping. *sigh* Might as well show you.


Not what I wanted at all! Soooo... I fixed it. And then I spent another hour or three going over every straight line with a teeny tiny paint brush and driving myself insane because no matter how hard I try, painter's tape and I are not best friends. At best, we tolerate each other's existence. But I finally beat the painter's tape lines and hung that sucker up.

It does need a frame. I'm looking! I'm looking! I promise! As soon as I find a good one, I'll let you know.


I painted some old bottles and Dollar Tree vases using this extra fancy technique. It did take much more time than spray painting them, but I love the extra gloss the glass provides because the paint is on the inside. And then I put a cute little heart sticker on the little bottles just because I could. 


I KNOW! The flowers! I usually don't have this many fake flowers going on, but I can't help it - I think they're perfect for spring! If I had a garden, maybe I'd use the real thing, but for now... I LOVE these!

Look how ugly this Estate Sale find used to be before I saved it. What do people keep inside such vessels? I have no idea. 


And look at it now! It's all growns up! Are you dying to know what I keep inside it? Lip balm. Because I stash lip balm in every room of my house. I'm addicted. Now you know my secret. My mantel holds flowers, painted vases, and lip balm.


Remember I said I wanted to use the canvas as a backdrop, right? I taped some jute to the back and clothes-pinned on some simple hearts I cut out of scrapbook paper to see if I liked the general look of it.


And I did! I liked it! So I took the hearts down and fancied them up a bit. Sparkle makes everything better.


Now those are some serious Valentine's Day hearts!


Happy Spring!


Sunday, January 1, 2012

Creamy Avocado and White Bean Wrap

I found this recipe floating around on pinterest. I'm all about healthy eating if it tastes good. Well! I tried it, I loved it, I made a couple changes for practicality's sake, and I loved it even more!

Look at it! Doesn't it just look so healthy and so delicious!?!


Creamy Avocado and White Bean Wrap

Ingredients:

6 T cider vinegar
3 T canola oil
1 t salt
1 t pepper
4 cups shredded red cabbage
2 15-ounce cans white beans, rinsed
1-3 canned chipotle chiles in adobo sauce
1 lime
4 medium carrots, shredded
1/2 cup chopped fresh cilantro
2 ripe avocados, sliced
1 cup shredded sharp cheddar cheese
1/2 red onion, chopped
4-6 large wraps

A note about the ingredients:

I've made the red cabbage slaw directly from the recipe, but I've also used the slaw from this Red Cabbage Salad recipe. The wraps turned out equally delicious both ways, so I'm going to guess that you can use any vinegar-y slaw that you like. 

I love the flavor and spice of chipotle chiles, but feel free to skip them if you adamantly dislike spice. 

Same with the cilantro. I know, I know! Haters gonna hate.

If you look at Eating Well's recipe, you'll see how I changed some stuff around. I like to prep the ingredients of the wraps, store them in separate containers, and stick everything - except the avocado - in the fridge for when I need an easy lunch. That's why the avocado is separate in my version - because, no matter what, that avocado and bean mixture of theirs is going to be turning colors the next day. If you have everything all prepped, then you can slice up the avocado at the last minute and it'll still be green. 

I used spinach herb wraps for these, but any wraps - or even large tortillas - will work just fine.

How many wraps it's going to make depends on how much of the deliciousness you stuff into your wrap. I like my wraps falling-apart-because-they're-so-stuffed size, but it's up to you. :)


Make it:

Whisk vinegar, oil, salt, and pepper in a medium bowl. Add cabbage and toss to combine. You can even do this step a day or two in advance. The longer it sits - the better it gets!

Pulse beans, chipotle chiles, and juice of lime in a food processor until slightly mashed.

To assemble the wraps, spread about 1/2 cup of the bean mixture onto wrap. Add as much of the remaining ingredients as you like - carrots, cilantro, avocado, cheese, and red onion. Roll up, cut in half, enjoy!


Happy and Healthy Eating!