Pages

Wednesday, February 22, 2012

Hardware Valentine Art

Obviously, badassery like this has no timeline. 


Which is why I can be perfectly confident showing you this Valentine's Day craft a good, solid week after Valentine's Day. 


The whole idea came from when I made these during Christmas time. 


And while I still might make some super sweet all-pearly ones next time, I was really feeling like I wanted to toughen it up around here. Look at all that sugar!


So here's what I did (it was super easy!):

I painted some canvases. Then I traced on some heart shapes that I had cut out of white paper.


I tacky glued on some stainless steel flat washers and some hex nuts. You know, for the badassery part.


I can't be the only one who cruises/drags her children up and down the aisles of Lowe's looking for art materials. 


Then I tacky glued on some pearly beads. You know, for the sweet part.

Nuts and Washers and Pearls, oh my!


This canvas represents my kids. Because I'm all deep like that.


Then I made a Mama heart.


And a Daddy heart.


Then I stuck them all in frames. Wait. No. I TRIED to stick them all in frames.

Here's where being a cheapskate bites me in the butt. As it does quite often.  

I bought the 8 x 10 canvases on sale at Michaels. 
I bought the 8 x 10 white frames on sale at Michaels. 
Now, wouldn't you THINK that 8 x 10 canvases should fit into 8 x 10 frames? Because it turns out that I don't live in a world where they do. 
Only one actually fit and I had to shove that stupid thing in with all my cheapskate might.

This one fits:


These don't. I know they look like they do, because I'm all kinds of magical like that...


Look closer....


This is what I expect the canvas-in-frame world to be like:


This is what I get:


If I'm not cussing up a storm at some point during the craft making, then... 

Well, then it would just be easier, but whatever. I'm already over it.

Because look at how cool they are! When people come over to my house, and they see the hearts, and then they do a double take, and then they realize what the hearts are actually made of... You can almost hear them thinking... "Well now, there is definitely some Sweet Badassery going on around here." 

or maybe they're thinking... "Dude! Buy a freakin' frame that fits! Cheapskate!"

Ha Ha! I DON'T CARE! 

BAD.ASS.ER.Y.


It's kind of awesome.


Monday, February 13, 2012

Stained-Glass Window Hearts

It's been a while since my kids and I made tissue paper Stained-Glass Hearts for Valentine's Day. And since I have been all up in my dining room windows' business as of late, I thought we'd better get a move on.

A few years ago, I made these:


I still like them, but this year we decided to switch up the colors a little bit. I'm going to give you a brief run down of how we made ours, but if you want the No Messing Around In Depth Version, go here.

Start by ripping up a bunch of tissue paper into 2-3 inch pieces. They don't need to be perfect AT ALL.


Choose some pretty card stock or scrapbook paper and cut out 2 identical hearts for each Stained-Glass Heart. It's easy if you layer your paper before you cut.

Cut out a smaller heart shape from your  larger heart shape so that you have a heart-shaped frame. I wanted to hang the Stained-Glass Hearts from fishing line when we were finished, so I wanted to make sure both sides of the heart would be pretty. The smaller hearts are extra - you can do whatever you want with them. 

Open up the heart frame and lay a piece of wax paper ON TOP of the frame. You're just using the frame as an outline to see where you need to stick the tissue paper.


Use a foam sponge brush to wet the wax paper with liquid starch (or white glue mixed with water). Add 2 or 3 layers of tissue paper. The more tissue paper, the sturdier your heart will be. Make sure you completely cover your heart frame.


And make sure all the tissue paper is very wet with the starch.


Remove the heart frame from underneath the wax paper and let the wax paper / tissue paper / starch dry overnight.

Line up the heart frame on the tissue paper craziness and cut the wax paper / tissue paper along the outside of the heart frame.


Carefully and slowly peel the wax paper from the tissue paper. This part can be tricky, but I promise, it is completely doable if you are careful. Good luck to you!
You can definitely leave the wax paper on, but then it mutes the tissue paper colors on that side. If your tissue paper rips, just dab it with a little more starch or white glue.


Glue the tissue paper heart inside the two identical scrapbook paper frame hearts. 


Place your Stained-Glass Heart under a heavy book for a few hours. Glue some fishing line to the heart and hang it near a window to let the sun shine through. Or you can skip the fishing line altogether and tape your heart onto a window.

TA DA!


Ella and Peyton made a couple, too. I love love love crafting with them!

Ella made hers with pink frames and rainbow colored tissues.


Peyton made green and blue hearts. Because he's tough like that.


I experimented with this one a little. While the tissue was still wet with sticky liquid starch, I stuck some of that craft plastic-y iridescent snow to one side. It's pretty, but the sun has a hard time shining through it. Totally worth it for all that extra bling.


I like this sunshine-y yellow one, too!


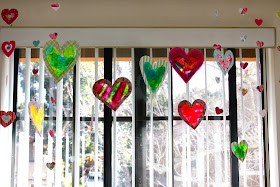
We ended up making quite a few. I think they look really pretty all grouped together in our dining room.


And when the breeze blows through the window and they all sway - well, it's just beautiful.


I hung them right in the middle of my Paper Hearts. We've got all sorts of Valentine's Day color going on in here!


I love eating in here, surrounded by happy hearts: The punched-paper kind, the stained-glass tissue paper kind, but mostly, the real-life family kind.


Did you almost just gag right there with that last sentence? 

Because I did. 


Happy Valentine's Day!


Wednesday, February 8, 2012

Paper Heart Window Treatments

So we have this little dining area. It may be small, but it's cute, and it has three big windows that the sun shines through all day long. It really is a lovely little nook. The windows would probably look nice with curtains, but I'm not going to be buying them any because we're not staying here forever, and that's just the way it goes. 

During Christmas time, I hung some extra large Dollar Tree snowflakes and some smaller, jewel-toned, glittery Target snowflakes from fishing line and I clear push-pinned them to the ceiling around those windows. And I really kind of loved how it looked. 


But up until this year, I've been a Valentine's Day decorating slacker. I have boxes and boxes of Christmas and Halloween and Easter decor, but Valentine's Day? Zero Point Zero Zero.

Time to get to work!

I invested (they're worth it, but still! Dang!) in three heart craft punches - one for small hearts, one for medium hearts, and one for larger hearts. And then I punched and punched and punched and punched away. And then I cut a whole bunch of varying lengths of fishing line.

I used those sticky photo mounting squares and attached paper-punched hearts back to back all along the lengths of the fishing line. Some of the hearts even got a little extra rhinestone sparkle like that one down there. Those sparkle hearts have been acting a little Star-Bellied Sneetch-ish ever since.


I also made some hearts with two heart sizes layered up...


And even...

- wait for it - 

...all three heart sizes layered up. That's six heart punches per heart! The craziness! Since I used the punches, it was super easy to sandwich the hearts back to back evenly so that you can always see a pretty side no matter which way they sway in the breeze from the windows. 


I did have to use a bit of actual tacky glue for the big guys because the mounting squares couldn't handle the weight. Wimps. I used scrapbook paper and card stock, for crying out loud. Didn't matter, the fishing lines with the big hearts were shedding love hearts all over the place before I reinforced them with the glue.


It was really kind of relaxing and fun. I didn't even bother making the sides match. A heart might be blue on one side and red on the other. I know! Wild.


I like that they are so simple and so sweet. 

And I really like the pretty colors they bring into the space.


Winter snowflakes and then Valentine's hearts and then.... I was going to tell you not to worry, that I'd stop before I start hanging decorative Easter eggs.... but looking at these pictures, I can't make any promises.

I see lots of holiday window treatments in store for our little dining room!


Go little hearts, go!


Happy Valentine's Day decorating!