Saturday, August 4, 2012

Stained-Glass Butterfly Craft Kit

My Stained-Glass Butterfly Craft Kit got revamped! Oh, the colorful sparkliness of it all!


So now the craft kit makes even more butterflies! It contains supplies to create FIVE butterflies with lots of mix and match decorations - colorful tissue paper for the wings, preprinted decorative paper butterfly bodies, iridescent chenille stem antennae, and lots of sparkly sequins!


I'm pretty proud of that rainbow butterfly. I ripped the tissue paper into long strips and just went for it. Then I matched the sequins going down his body so he's extra, extra rainbow-y. I love him so much that I made him my etsy shop avatar. And then I was inspired to change my shop banner, too. Go look! He's my own little fluttering muse. 


Ready for some behind-the-scenes glamour? Now, I'm not a professional photographer. But I'm pretty sure any professional photographer would have taken the butterfly pictures EXACTLY like I did.  

Which is by lying on my back on the dirty cement while giggly, squirmy kids held a backless, glass-is-taped-to-the-wood-and-it-might-fall-out-and-shatter-at-any-moment frame above my head so I could take pictures.

They could not, for the life of them, hold that frame level.

Do you see what I go through? It's a very dangerous line of work I'm in. 

Oh, look! That kid there thinks holding the frame with his 8 year old thumbs is perfectly safe.

I could not get out from under there fast enough.


But anyway!

Big news! I've changed my craft kit packaging! Slowly but surely, I'm going to be switching over from the bags to these extra fancy looking things:


I loved the bags, but boxes are much more sturdy. 
It also might have something to do with the fact that when I had a booth at an outdoor craft fair recently, the craft kit bags kept blowing over and it was really driving me bananas. BANANAS! I just don't need any extra crazy in my life.

And, seriously, this box is a gift giver's dream! It's colorful and pretty enough to give as is, or you could easily wrap it up in decorative paper, or you could just slap a bow on the top and call it a day.

Anyway. Look how cute the back is! Why, yes, I do feel a little extra professional right about now.


Did you notice how the rainbow-colored blocks on the packaging match the banner in my etsy shop? I'm pretty excited about all the changes going on around here.

The butterflies look best taped to a window, but you could also hang them up on your child's wall, like so...


Or go for a simple framed look...


Cute! Cute! 


Happy crafting!


Monday, July 16, 2012

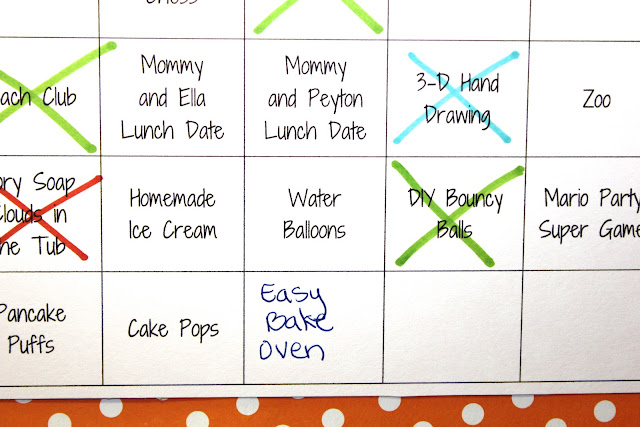
2012 Summer To Do List

Yeah. So I'm thinking this summer might be a little blog-lite. Because I've made myself quite a list of stuff to do, yo!


And that's just the Family List. My personal list could fill another 2 pages. But that one is full of really dumb things, like clean the freakin' refrigerator. Which I happened to do today and let me just tell you! It is BREATHTAKINGLY SPARKLING in there! 

This list is much, much more fun! Places to go, people to see, kid crafts to make that I saw on Pinterest and Lord help me I WILL NOT continue to add to my Kids pinboard without doing something about it.

Making the list was easy. I just made a Word table, filled it with stuff, changed the font to something cute (Shadows Into Light from dafont.com - my favorite font site), printed it, stuck it on some cute paper and displayed it on the fridge for the world to see.


I even left a few spots open for things we forgot to add, like make some more "delicious" baked goods with Ella's Easy Bake Oven. 

I'm not going to lie. I had an Easy Bake Oven when I was a little older than Ella is. Even then I knew that shiznit WAS NOT what baked goods should be. But I love Ella, and there you go. She bought that Easy Bake Oven with her allowance and she is just the sweetest little girl ever in the world when she is in the kitchen with me. So, I'll eat anything that comes out of that little oven and I'll gush on and on about how amazingly yummy it is. Because good mothers lie to their children. I'm pretty sure that's in the mothering manual. Where it SHOULD BE is in the Easy Bake Oven manual. Just sayin'. 


We've been busy!!!


And, seriously, how cute are those magnets? My mom got them for the kids - you know, for artwork on the fridge purposes. Adorable!

Soon I'll show you some of the cool things we've done. And by soon, I have no idea what I'm talking about. I can't be making any summertime promises. I like my summers open and schedule free and obviously full of lists. I can never give up my lists.

Happy Summer To Do Listing!


Friday, July 6, 2012

Garden Caterpillar Classroom Kit

I know you've probably seen this cute little guy before. You can find him here.


But you've definitely never seen him like this! Getting all mass produced in a classroom kit!


This classroom kit is for 10 kids, but you can also order a classroom kit for 20 or 30 or 10,000! Although the standard 3-5 business day turnaround may not apply to that last number.

Here's what you get! Styrofoam balls that craftily become caterpillar heads and tails. And bright yellow paint and colorful chenille stems and crayons and lots of other goodness. Like colored toothpicks. For grown-up use only! You'll poke your eye out, kid!


And lots of rainbowlicious craft foam and circle templates to make the caterpillar bodies. Mix and match style! All packaged so you can easily pass out the materials and create garden caterpillars with ease. Because I care. Oh, and also, because I care, I always include extra craft foam color pieces. You don't want the last kid in line to be stuck with zero options. That would suck. We've all been that kid.


Even though this is called a classroom kit, it can most definitely also be used to create party favors or for play dates or summer camps or to decorate your neighborhood! Because, c'mon! Adorable! 


Happy Classroom Crafting!


Wednesday, June 27, 2012

Lemon Blueberry Rainbow Cake

So last year, on the last day of school, I made The Rainbow Cake. And then my kids and my husband and I all decided that Rainbow Cake should be a new Last Day of School tradition.

The end of this school year was amazingly busy. School was busy, my craft kit business was busy, we were all busy busy busy.

And then the last day of school came. And went. And no Rainbow Cake magically appeared.

Fail.

But! We're an easy-going tradition kind of family. And since we had planned on a day of camping this weekend, we decided to Rainbow Cake It Up.

Rainbow Cake is made with yellow cake mix. I used it for last year's Last Day of School Cake,


and Peyton's Birthday Cake,


and Ella's Birthday Cake.


You know what? I don't love yellow cake mix. And since I'm the one making all these dang cakes all over the place, I think I can make a decision every once in a while.

I'm a'gonna make a lemon cake! And blueberries were on sale, so... why not? But when I say lemon cake, don't be thinking that I'm making it from scratch - forget it - this kind of cake takes enough time as it is - I'm box-caking it all the way.

Also, and I've mentioned this before, two tubs of frosting is not enough. I'm okay with that. I could use three, but really! Three tubs of frosting? It might make my cake look awesome, but that is a lot of freakin' frosting. I'm not going to do it. I'm going to use two and call my cake "rustic" instead. 

Why, yes, that is a fire pit in the background. Why, no, I don't think this is an acceptable dessert for camping. For the record, I've never brought a cake camping before, but just this once, I think it's okay.


So here's what I did, I followed the regular directions that you can find here, except, of course, I used lemon cake mix and frosting.

I don't use food coloring drops, I use food coloring gel, but imagine adding one drop of blue to one layer, then two drops to the next layer, then three... you get the idea. Except they're not really drops, because it's gel, so... one glop, then two glops, then three... Totally sexy. Glop.

Fire pit in the background!


Did you notice how nicely the original Rainbow Cake and this Lemon Blueberry Cake is sliced? I mean, compared to the crazy-Birthday-Party-oh-my-Lord-feed-the-hungry-masses-of-party-children-before-they-attack-Cakes. 

I'm only totally afraid of my children some of the time.

Anyway, after I had come up with the idea of the lemon blueberry rainbow cake, and before I actually made it, I pinterested (as that should totally be a verb by now) blue rainbow cake to see if anyone had done something similar. If you want to see something REALLY beautiful, go see what I found. Aim for that one, end up with this one...


be happy.

It was delicious! Tradition crisis averted.


Sunday, June 17, 2012

Father's Day Frame 2012

It's Father's Day Frames Time!


We've done these for 4 years in a row! You can see the other years AND the How To here and here.

I really, really recommend this craft. It doesn't take all that much time, or effort, or money. It's super personal and my kids love making them every year.

I think they mostly love it because I leave all the major decision making up to them.

I drag a bunch of photos from the current year into a folder (about 15-20 per kid). Then I let them each choose 10. Not all pictures will work because of the placement of people in the picture and the shapes of the letters, so 10 seems to give us enough good options. BOTH kids wanted to keep all their leftover pictures. I'm telling you, they love this stuff!

This time, Ella decided that she didn't want any black lines of the letters showing. When we cut the letters without the black lines, we had a little bit of extra space inside the letters. So she decided to pack two pictures into each of the D's. I love it! They look really cute! She also decided to back each letter with colored paper, just like she did last year.

Check out the bottom of the second D - Happy F-Day. "It stands for Father's Day!" she told me. Obviously.

Although... when I see Happy F-Day, it's possible I think something else. AM I THE ONLY ONE?


Peyton wanted the black lines of the letters showing, but he liked Ella's two-photo idea, too, so he did some of that. He did not want colored paper on the back, just like last year, so I backed the letters with some light cardboard to give them more stability. It's funny, I didn't even show them last year's frames, but they both still picked the same backing as they did last year. I wonder if they remember, or if it's just their personal aesthetics coming through? It's adorable either way.

Check out the Y - To: James. You know he did that just because this is really important to him and he wanted to be very serious and proper. So sweet. Oh, and the third D. He wrote Peyton J W Jr. He's not a junior, obviously, his dad's name is James. I guess because he is his father's son? I didn't want to call him on it because he was just so proud.


I just LOVE these! Simple traditions are the best!

Happy Father's Day!


LinkWithin

Related Posts Plugin for WordPress, Blogger...