Thursday, April 26, 2012

So...I Painted Something.

But I'm not quite sure what it is.

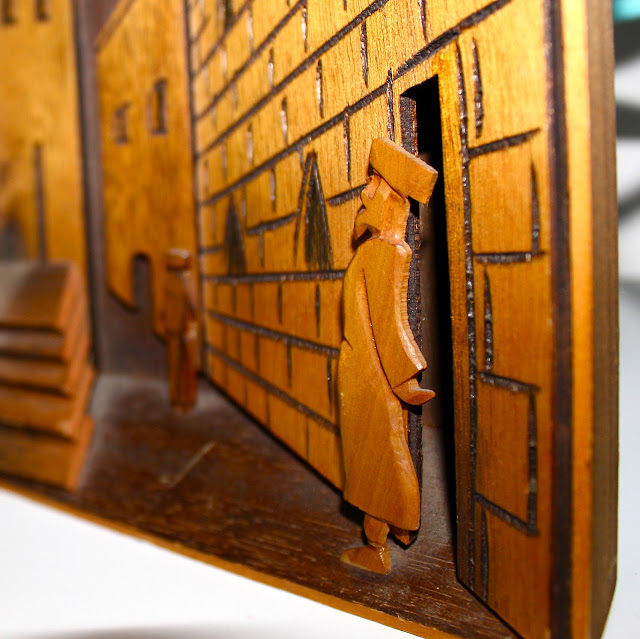
When Ali took me to the Long Beach Flea Market a few weekends ago, I saw this layered wood / relief art / 3D thing. It was broken. That arch piece laying on its side is supposed to be layered on top of the other two arches. An easy fix, so I wasn't really bothered by it. And, because it was broken, I was able to buy it for only $5!

Would anyone else would have wanted it anyway? Probably not. It's quite an odd piece.

But there is just something about it that I love. I'm sure it's because it looks like some kind of cathedral town / market square type of scene. Ever since I read The Pillars of the Earth, I have special kind of love for cathedrals and arches and monks.

It's a beautiful, quiet, peaceful, and calming scene.


But who are they? Maybe Muslim priests? What do you think?

Anyway, it's definitely not some fancy heirloom piece. The wood is thin and cheap. When I tried to clean up all that dust, this guy's ankle totally broke. It was a clean break and it popped right back into place. Phew! These priests are tough!


I love the scene, I never said I loved the wood. Time to paint!

I started by spray painting the whole thing white.


Then I added a little color. Or a lot.


And now it's still beautiful and quiet and peaceful...


Only now it's a little extra colorful and happy! 


I love it!!!


Wednesday, April 18, 2012

Gnome and Mushroom Banner Craft Kit

YAY! I just created a brand spanking new craft kit! It's about time, I know!


Here's how it all started. I lived in California. I didn't care about gnomes. It's sad, but true. I'm a little ashamed.
I moved to Iowa and I went to Reiman Gardens where they had this traveling exhibit. And I fell in love with gnomes.
Then I moved back to California. I seriously needed some gnomes in my life so I created this gnome kit. It only took me two years. Because I'm really speedy like that. The end.

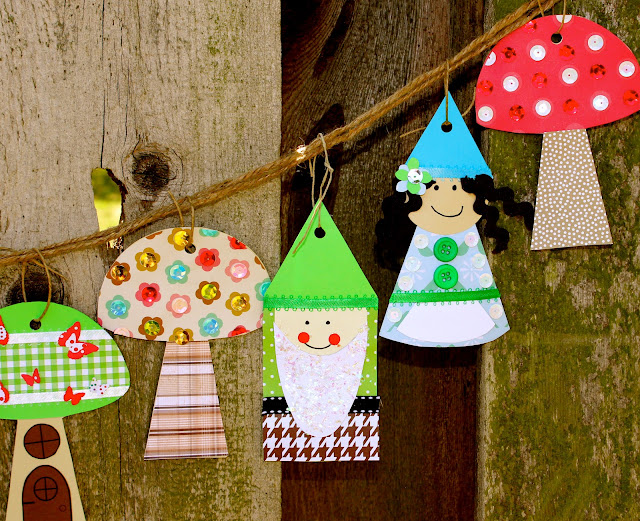
Gnomies! And mushroom homes for shelter, of course!
Here's what you get!
3 boy gnomes!
3 girl gnomes!
6 mushrooms!
And enough jute twine to string them all together to make the sweetest dang banner you ever did see!

And I'll even send you a page full of exclamation points if you didn't get enough just now.


The boy gnomes come with lots of choices of fancy scrapbook paper shirts and pants and beards. And bling just in case your gnome wants a sparkle beard. It might just give him the boost he needs to pick up some gnome chicks. Who knows? Help a gnomie out!

The girl gnomes come with lots of choices of fancy scrapbook paper dresses and aprons and curly rick rack ribbon hair. And bling just in case your gnome wants sparkly hair. And, really, what girl gnome doesn't want sparkly hair? It brings the magic I tell you!

The mushrooms come with lots of choices of fancy scrapbook paper mushroom caps and stems and wide fancy stripes. And cute little doors and windows that don't even open and are way too small for the gnomes to actually use. Whatever! Maybe they can use their magic or something. Don't give me any grief, gnomes! Make it work!

You will only need scissors for this kit. It's great scissor practice for kids to cut out the preprinted, colorful, and simple scrapbook paper and cardstock shapes. And, besides, cutting the shapes is relaxing, easy, and it provides great quality time.


And! I've also included decorative ribbons, hand-punched paper flowers and butterflies, sparkly sequins, 
colorful buttons, and scrapbook paper shapes. 

Oh! And rosy cheeks! I almost forgot about the rosy cheeks!


It is a lot of cuteness.

Not that you need an excuse to bring gnomes into your life, they do bring magic and good fortune, after all.

BUT!

This kit would also be perfect to decorate a woodland-themed party. Or you could have the party guests create their own gnomes to take home as a party favors.

Or you could make your own gnome family. Have each member of your family make a gnome and a mushroom house - how cute would that be!!!

I don't know. I might just make a bunch to hang from the ceiling in my closet. So that they can greet me every morning with their magical adorableness. And maybe they can do some cleaning up in there. I mean, if they're just going to be standing around all day. They might as well do something. Get to work, gnomes!


Anyway. They come all packaged up in this:


Cute, right?


Happy Gnoming!

Tuesday, April 10, 2012

Clipboards!

You knew that I used to be an elementary school teacher, right? I taught 3rd and 5th grades for a few years. Then I had Kid One, and then Kid Two, and then I was outta there. I did love teaching, I did! But you never ever feel like you're doing enough and... Anyway, a story for another day.

Teaching taught me a zillion bazillion things, one of which is that kids love clipboards. It's a fact. We didn't use them every day, but man oh man, when we did - happy students! And we're not even talking about fancy clipboards. Nope. Just plain, old, boring, cut-off-your-finger if you clip it by accident, survival of the fittest kind.

Like this:


So I decided to make some clipboards for the kids in our family for Easter. The kind that are a little less dangerous are also much more expensive, soooo.... It's back to the survival of the fittest kind. Because I'm cheap. So let's hope our kids are of the fittest group.

Anyway - super easy! I painted just the outside edge of each clipboard, front and back, in each child's favorite color. I didn't want much of the standard clipboard color to show and the clipboards are a little bit taller than the 12 x 12 inch paper I had picked out.


Then I Mod Podged on the scrapbook papers that I had cut to size. Peyton and Ella wanted to decorate theirs with marker first, so you might see some extra fancy artwork on a couple of the clipboards in the next few pictures. Peyton decorated the back of his with all of our names written in his version of cursive. Adorable. Ella decorated the front of hers with our names and then wrote I LOVE PENNY all over it.


You may also want to make a template if you want your paper to fit well. But don't take that one single template too seriously. You may need to make several. Because those clips at the top aren't necessarily in the same place on each clipboard. Stupid clips. 

I made one single template, traced all the paper, cut all the paper, began to Mod Podge the paper onto the clipboards, and then! What the What!?! Why is this piece hanging off the clipboard by 1/2 an inch when the others fit perfectly? Cue profanities. I had to recut the piece - see the top left clipboard - so it would fit. It still looks good - maybe even better than the others - but it's the principal of the matter! They should all be the same!


You will need to find a way to keep the clip open while the Mod Podge dries. I cut in half and twisted up some chenille stems that I had lying around. They worked perfectly. (I took all of these pictures when the Mod Podge was still drying, so if the paper looks a little weird toward the top, that's why.)


Ella and Peyton chose their own letter stickers...


But I got to be the boss of the others.

And we have one little cousin who isn't in school yet. Since she has yet to learn how to NOT cut off her fingers by using a clipboard, I layered 5 or 6 pieces of pink adhesive-backed felt on hers to protect her sweet little fingers. Just in case.


You know what else would have been nice? Spraying each one with a clear glossy finish to protect it. You know what didn't get done because I ran out of time? Spraying each one with a clear glossy finish to protect it.

But! I did clip some Easter mazes and word searches and little pencil pouches stuffed with Easter pencils and cute erasers and little toys and candy.


Success! My kids use them in their room, on the table, on the floor, in the car and as a MAJOR BONUS, they still have all their fingers intact and it's already been two days!

Monday, April 2, 2012

Spring Canvas - Easter Style

It was finally time to change up the Spring Canvas. One week before Easter because I'm super on top of things this year. Judge away.

So I stripped off the hearts...

And got out some eggs...


And rainbowed them up...


Who's making all that noise because I'm not paying any attention to her while I take pictures? Oh yeah, this one...


Oh, Penny. Stretch away, Cuteness.

Then I threw the canvas back up above the mantel. Ha! I'm so cavalier about it. Let's pretend like that's reality. Like I didn't string and restring fifty different combinations of eggs across that thing.


What's that? You really love that Easter Egg Banner that's strung across my mantel? You really wish you had one for your very own? Hmmm.... I REALLY wish I could help you out. Oh, wait, I can! ShaBam!

Anyway. Back to not plugging my own stuff. You KNOW I have a hard time buying holiday things that are not on after-the-holiday clearance or that I don't have a coupon for. But! Just look at that little lamby! He came from Pier One. This year. Before Easter. Without a coupon. I did exchange something for him, but still! This is a big deal for me. He's totally top-heavy and falls over at least once a day. Totally worth it. I love him.

Those little eggs in the vase are from The Dollar Tree. I got them today. Because I wanted to take pictures of my canvas and my mantel and I really just needed a bit more color. So I ran down there, spent two bucks on eggs, and ran back (or maybe I drove - it's all a blur). For you! Because that's how much I care! I just cut off the little hanging loops that they came with. And then I piled them into a Dollar Tree vase that I had Gorilla Glued onto a Dollar Tree candlestick holder. Super easy and cheap and I love the color! 


Cute Cute Cute! Good little eggs all lined up. At least something is neat and orderly around here. It's okay. I'll take what I can get.


 Happy Easter!


LinkWithin

Related Posts Plugin for WordPress, Blogger...