Sunday, September 25, 2011

Halloween Pumpkin Banner Craft Kit

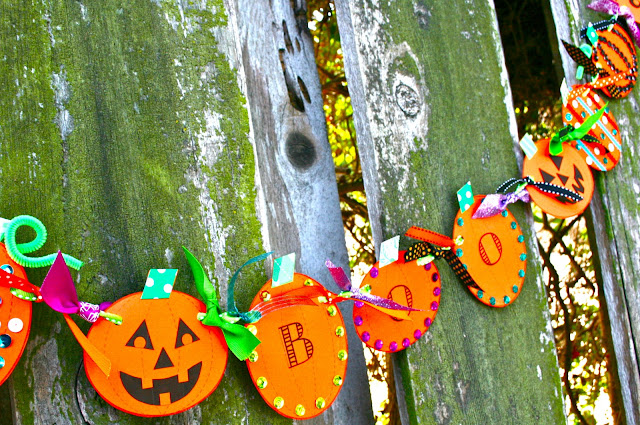
It's new craft kit time! Introducing my new Halloween Pumpkin Banner! And this one, just like the Christmas Tree Banner kit, is for the whole family to enjoy!


The kit includes supplies to make a 7-foot banner with 12 spookilicious pumpkins. All you need to supply are a super awesome kid or two (you can have up to twelve kids make this kit) and scissors. Really, you don't even need to supply the kids. Make one all by yourself. I did.


But! If you do make one with the kids, here's the plan: You gather everyone at a table, or even a nice big spot on the floor, and lay out all the decorations I've included - short pumpkins, tall pumpkins, scrapbook paper stems, chenille stem vines, sequins, letters to spell out BOO, lots jack-o-lantern eyes and eyebrows and noses and mouths, and decorative ribbons! Whew! That's a lot of fun stuff!


Then you divide up the pumpkins and start decorating! It's fun and creative time for the whole family. Most importantly, it's quality time with your kids - it doesn't get any better than that!


When all the pumpkins are completed, you string them together to create a beautiful Halloween banner (and memory) that can be lovingly brought out year after year. 


If you have 2 or more kids decorating the pumpkins, and they each want a banner, it's no problem! Just cut the long banner ribbon into as many pieces as you need, and each child can make a mini-banner! 

And look at the cute packaging it all comes in! 


Here are some extra pumpkins the Ella, Peyton, and I made. 


Ella made the witch with the sequin face and purple and orange ribbon hair. Then she sweetly asked me to cut out a witch's hat. And that's why I now include a piece of plain black card stock in the decorations - just in case your kid is super creative and thinks outside the sequin-BOO-letters-jack-o-lantern-face-decorative-ribbon-box - I've got you covered!

Peyton made the scary-looking jack-o-lantern with the lightning bolt eyebrows. I don't think he even cared about the rest of the face. He based his whole pumpkin around those lightning bolts.

I made the mummy pumpkin with the orange and purple criss-cross ribbons. I love my spooky little mummy pumpkin!

And we strung them all up on a mini banner. I love it! And my kids love showing off the pumpkins they made.


Happy Halloween Crafting!


Saturday, September 17, 2011

"Blue Ocean Breeze" Spray Paint Beneficiary #839

I've had this candle holder since before James and I got married. Whooeee! That was a long time ago! This December we will have been married for A DECADE! 10 years and it only feels like we've been married for 5 minutes. Like 5 minutes UNDER WATER. Ha! Just kidding! I love you, honey!

Anyway! Z Gallerie candle holder. Old and boring and black. I still like the curvy Asian pagoda look of it, but the color was just not not meshing with what I have going on in this here joint.


Someone should really clean up that wax.


I think it saw me coming with my can of spray paint, because I found it cowering in the corner of my closet.

Take that, sucker! And take these new white candles, too!


Do you hear the pagoda candle holder angels singing?

Now it's no longer banished to the dark recesses of my closet. It has earned a prominent position on the top of our bedroom chest dresser thing. 


Next to my favorite Ross owls and Z Gallerie clearance hourglass. So sparkly! 


I'm not the kind of person who doesn't light candles in order to keep them all perfect and fancy. But, I'll tell you! I'm having a hard time lighting these. Maybe because it's all so white and shiny and sparkly up in here. The rest of my house is not like this. In comparison, it kind of goes like this when you look around: crap crap crap junky crap SPARKLE WHITE AND BLUE PRISTINE DRESSER TOP crap crap. Okay, not really! But still! It's like this (but replace the Fluffy with SPARKLY AND PRETTY!):


Even when we had that big huge California power outage a week ago, and we were without power for nine hours, and night came, and it was dark, and we lit about a thousand candles, we didn't light these. Weird, right? I have my priorities.

We still need some sort of artwork to put on the wall behind it, but I still really love how it all looks. 


Sometimes, when James and I are feeling really wild and frisky . . .

wait for it . . .

We switch the candle holder from one side of the dresser to the other. I KNOW! It's hard to keep up with that kind of marriage magic. 


The candle holder looks so happy in its new color, don't you think?


Saturday, September 10, 2011

My New Metal Basket

So I found this adorable metal basket at our local Flea Market. I fell in love with it, really. It was dirty and the paint was really dingy looking. But I loved how the wire is shaped all flowery and dainty. And I really loved the $5 price tag. I grabbed it and cradled it lovingly for the rest of my flea shopping day.


And then I took it home and painted it blue. I wanted to spray paint it, but I couldn't find the exact color I wanted. So I ended up mixing two blue and one white acrylic paint colors and hand painting it. I love this color!


And then, after a few tries on my computer, I was able to make the perfect sized circle template to line its bottom. I used the template to pre-cut out a whole bunch of different scrapbook papers. Whenever the mood strikes, I can switch the paper on the bottom. I definitely could have Mod Podged paper onto the bottom and called it a day, but I really like the idea of changing the paper and the look of the bowl.

Right now I'm really loving this white and red polka dotted combo.


Are you noticing the dark background? We stained our dining room table! Yep, the same table that I used in that very first picture at the beginning of this post. It was covered in rust stains and kid marker and all the other signs of a well-loved table. And now it looks so beautiful! But I have to save all that for another post because I'm still working on the chairs. How can I show you a beautiful table that is flanked with ugly, ugly chairs? I CAN'T! So for now, you'll just have see the beautiful dark stain that we used. And the beautiful blue basket that sits on top.


That is filled with apples and lemons.


And sometimes tomatoes.


And soon will be lined with Halloween bat paper.


And filled with eyeballs.


Or with orange flowers.

AND eyeballs. 3 bucks worth of eyeballs from The Dollar Tree. Totally worth it. In fact, I'm pretty sure I'll be purchasing a few more bags of decorative eyeballs soon.


Because, really, can one ever have too many decorative eyeballs? I think not! And, also, are you impressed that I just used the term "Decorative Eyeballs" in a sentence? 


I already have some Christmas paper picked out. I'm not usually a pine coney person, but this basket seems to want to be filled with a bunch for the holidays. Or maybe with some pretty ornaments.

Valentine's Day? I'm not sure yet. 


But I do know that for now, in the off-season, it's filled with fruit. And I love it.


And whenever I glance over and see my new basket, it makes me very, very happy. 


Saturday, September 3, 2011

Dry Erase Chore Charts

OH MAN! We needed some chore charts around here. I mean, Peyton and Ella DO chores, like cleaning their room and their bathroom and a bunch of other random things I make them do here and there. But although they DO the chores, they also DO A LOT OF WHINING about it.
The whining is always about their room.
yay. for. me.

And you know what else? Here's the kind of whining I get to deal with: "Mommmmmmmy! You always make us clean stuff that Daddy doesn't make us clean!"
seriously.

I'm not above paying off my kids so that they will shut the heck up.

I could go on and on about how chore charts teach kids responsibility and money management. blah blah blah.
Here's my real life: We started chore charts in our house so I wouldn't have to listen to the whining anymore. And it's been a WHOLE WEEK of using the chore charts. And guess how much whining I've heard about them cleaning their room. Just guess!
Zero point zero zero.
YAY FOR ME!

I also had another reason for Peyton and Ella to start earning some cash. They are always asking for stuff. And by stuff I don't mean food and water, I give that to them for free because I'm a super mom. I'm talking about fun kid stuff. I swear, we could go to the most boring store in all the land, an automotive parts store, say, and those two kids would be able to find something they wanted. They ask and they ask and they ask. Usually I say No. Every great once in a while I say Yes.

And mostly I tell them that they need to put in on their Christmas or Birthday lists. But really, that last part is mean because Peyton's birthday is December 17th and Ella's is January 9th. So I can get away with that kind of talk a couple of months before Christmas, but that's it. I can't pull that kind of crap in February because it's just cruel.

So, now, when they ask for stuff 50 times a day, I can airily respond 50 times a day with, "Well, do you have enough money to buy it?"
And if they say Yes, then I'll yell, "Heck yeah, get it!"
And if they say No, then I'll try my best not to yell, "Well, it sucks to be you, kid!"
or
"Now you know what it feels like when I can't buy myself a new pair of fancy boots because I've been buying you two ALL THAT DANG FOOD AND WATER!"

Anyway. Here's what I did:

I went to Michaels and got two scrapbook frames and then I spray painted them white.


I let Ella and Peyton pick out their own fancy scrapbook paper. I used that as the background of their charts. I printed up the charts that I made, backed them with coordinating paper, and glue-sticked it all together. I used a glue stick because I wanted to be able to easily replace their charts as I change the chores and the rates of pay. I stuck the charts in the frames and hung them up - done! 


The hardest part of this whole project was deciding what chores I wanted on the charts. I also threw a little math in there, too. I wanted Peyton and Ella to see how much money they were making for each chore and how it all added up (multiplied up, really).  For example, they are expected to clean their room 7 days a week for 5 cents each time, which earns them 35 cents a week. They will each clean the dining room table 2 times a week for 5 cents each time, which earns them 10 cents a week. They get the same amount for cleaning their bathroom sink and counter because they work on that together, so it's not too hard. 

All their chores add up to $1 a week. Too cheap, you might think? When I told Peyton and Ella they would earn $1 a week, Peyton's eyes lit up and he started jumping up and down, "Chores! Chores! Chores! Chores!" and Ella whispered, "A WHOLE DOLLAR?!?!" like it was some kind of magic.

I'm awesome like that.


The Parent's Choice is for bonus money and it's optional. Peyton, Ella, and I had an entire discussion about it. If they want to earn extra money, they can ask if there's anything extra they can do. I might have an extra chore for them to do, I might not. 

Also, I might ask them to do an extra chore. Sometimes I will let them earn a check mark for it. Sometimes they will just have to do it for nothin'. I didn't want them thinking that they would get money for everything I ask them to do around here. I didn't want any of that, "What am I gonna get if I do this?" nonsense. Gotta nip that rubbish in the bud. Before it even starts. 


Some things didn't even make it on the board because they messed with my magic $1 weekly total. Like laundry. Peyton and Ella always put their own laundry away. I fold it, stack it all nicely on my bed, sorted by theme, and they put it away. And they still have to, they just don't get paid for it. They like putting it away, anyway. They've been doing it for way over a year and they still think it's super fun. They're so weird! Every single time they make it into a race to see who can put away all their laundry first. It's adorable.

I hung the charts in the kitchen under my kitchen memo board and next to the refrigerator. I bought them some brand spanking new expo markers that I put in a magnetized holder on the fridge. Peyton and Ella LOVE using dry erase markers. Doesn't every kid? 

I should have just ditched the payment plan and told them that every time they do a chore they would be ALLOWED to write a check mark on the glass of their charts with the magical dry erase marker. And if they complete all their chores they would be ALLOWED to magically erase the marks with a paper towel at the end of the week. 


School hasn't started here yet, so they can't do the Empty Backpack / Lunchbag chore. And we're in the process of painting and staining our dining room table, so that's out, too. They've decided to make up the missing chore money with doing a bunch of Parent's Choice chores this week.


I love the charts.

Peyton and Ella love their charts.

And, wait, what's that sound? Ah, yes, it's the sound of a room being cleaned with the glorious absence of whining.


Friday, August 26, 2011

Kid Memo Boards

Peyton and Ella share a room. You knew that, right? It's a small room, but we make do. I try to separate the boy and girl stuff the best I can to give my kids their own space within such a tiny space.

See how Ella has her side of cubes and Peyton has his side of cubes? It looks okay, but I wanted it to fancy it up.


Their memo boards used to be in our basement playroom in Iowa. That was when we had space to spare. So much space that I made art boards for each of them just because I needed to fill up some wall. 


The pink and blue boards matched the color theme of their little kid playroom. But now that the boards are in their big kid shared room, they really a needed a make-over.


So I bought fabric in their favorite colors. Purple for Ella. Green for Peyton. How I love shopping for fabric! When I don't have the kids with me it is such a relaxing task!

I stripped both boards of their old fabric and ribbon and got to work. 

I painted the outside of Ella's frame:


And hot glued on the fabric. As I become more Craft Mature, I'm realizing that any good project is going to make me curse like a sailor at some point. 

The best framed cork boards are the ones where you can take off the frame, pull the fabric around to the backside, staple it on, and then reattach the frame. The fabric is nice and tight and evenly attached. This is not that kind of board. 

So my fabric is cut perfectly and I've even folded it over and ironed the edges to make it extra perfect. But as I start at one side and glue and flatten and straighten, the fabric stretches and moves around and then I have extra fabric in the corners of the other side and I don't know how to fix it. And cutting fabric that is mostly glued down is a disaster. And I don't want to cut too much, because then the fabric pattern will be all wonky and uneven. I vividly remember this exact thing happening last time I made the boards. It's a frustrating mess. I know you can't tell from the pictures, but believe me! Hot messes are running rampant around here.

But that's what embellishments are for, right? To cover up hot messes. I was planning on embellishing the boards anyway. Really! I WAS! Dang! 


I glued on matching ribbon:


I did the same for Peyton's:


I had originally planned on embellishing Ella's board with a bunch of purple silk hydrangeas. But, really, the whole thing needed a big pop of color, so I learned some new tricks and went for it. 

I bought a quarter yard each of some pretty fabrics, a handful of pearly and sparkly buttons, and some fabric glue. I got out my hot glue gun and scissors. I sat down on the couch and for two nights in a row I made flowers while I watched TV. 

Ella loved the flowers so much that she asked if I could make an extra of each one as a hair clip for her. So of course I did! 

It took a little time, but I found some great tutorials and I learned how to make rolled fabric flowers and petal pusher flowers. Once I got the hang of the techniques, they were pretty simple to make. After I had a whole bunch of them, as well as some silk-type flowers I had on hand, I started arranging and hot gluing them to Ella's board.


My kids LOVE watching me make stuff for them. I think it makes them feel extra special when I create things just for them. As I was arranging the flowers, Peyton and Ella walked into the room and they were both so excited - "Whoa! It's so pretty!" "That's so coooool!" 
It's one of the nicest sounds in the world.


Peyton's board needed some embellishing, too. I wanted to hot glue on some of his small toy jets, but he wasn't willing to give them up for decoration's sake. I don't blame him. 

He has a zillion army men, so I talked him into letting me have some for his board. Most of his army men are green and tan, which would match the green and blue hounds tooth pattern really nicely. But I wanted some extra color on his board, too. So I took the army men outside on gave them a few coats of spray paint. Here they are, about to meet their maker - their color maker. mwahahaaaaa.


They turned out really cool looking! Peyton liked the red army men so much that he asked me to paint extras for him to play with. So of course I did!

Since the army men have flat bases, I just hot glued them along the bottom of the board. Peyton helped me with the arranging. He has an eye for this sort of thing and he loves making patterns.


I was able to grab a couple of his red jets and attach them with push pins. I like the look of them, and Peyton is happy because he can take them off to play with if he wants.


I like that it's embellished, but in pure boy style.
And I think the boards look really neat next to each other.


I also bought some new pushpins to match the boards. Ella made hers into a happy face. With hair!


Peyton made his into bombs. And he added an extra jet and a race car patch.

I bought a bunch of extra fabric so that I could personalize their storage cubes a little more.

Because this is really 3 vertical sets of cubes that aren't attached to each other, it was easiest just to nail the fabric to the wall behind them. Easiest being a relative term. It was still a huge pain to line up the fabric with the cubes. There was a lot of pulling the cubes away, nailing fabric, moving the cubes back, quiet cursing, pulling the cubes away, removing nails, dropping nails, nailing fabric again, moving the cubes back, deep breathing and walking away. If the cubes were attached to each other it would have saved me a whole lot of under-my-breath-cursing.

But I REALLY love how it all turned out.


And Peyton and Ella are taking a little more pride in keeping their sides tidy, so it was all worth it.


LinkWithin

Related Posts Plugin for WordPress, Blogger...