Sunday, December 25, 2011

Christmas Ornament Wreath

Yes, I've seen the ornament wreaths around on the world wide web. Here and there and everywhere. They were kind of calling my name. So....

I decided this would be The Year Of The Wreath.

The wire hanger kind of wreaths are fine, but I wanted a really big wreath. I thought a nice styrofoam circle frame would work nicely. But when I went to Michael's, they were out! You've got some nerve, Michael's. SOME NERVE I SAY. And here's something about me. I have no patience when it comes to crafting. I will not be going to another Michael's, or JoAnn's, or anywhere else, and I will not be waiting until they have them another day. I want an Oompa Loompa NOW!

They did have this 18" floral wire wreath frame for less than 3 bucks. Sold! I took it home, gathered my balls - Ha Ha! balls. - and set to glue gunning all over the place.  First like this:


And then like this:


And then I glue gunned on some wide silver garland I had bought to cover up the wire. I really didn't want anyone to be able to peer through the balls and see some unsightly wire. Because I have class, damn it. Balls.


See? Like this:


I glue gunned and I glue gunned...


I did it all while I watched TV. It was kind of fun, actually. SO colorful and sparkly!


After I had used up all the big balls, I started in with the littles: 


Back view:


And when it was finished, I hung it up on my boring standard-colored door. And it was beautiful.
                                       

But I was worried the balls might fade in the sunlight - it's happened to me before with another project - so I decided to move it indoors. I didn't spend two-plus hours and a hundred gazillion balls to have to make a new one every year. No siree! 

So, I snapped a quick picture of it on my front door, brought it inside and hung it above my mantel, called my crafting confidant Ali, and declared WITH CONVICTION I was done with all my crafting for the season. DONE! And I was glad to say it. Glad to be able to focus on Christmas and other kinds of fun stuff.

AND THE CRAFTING GODS HEARD ME. AND THEY WERE VENGEFUL.

Because in the middle of the night I heard CRASH! CRASH! CRASH!

And I didn't even need to get out of bed to know that my last crafting project of the season was not done with me yet. Huge chunks of balls had fallen off that stupid wreath. 

Darn you crafting gods! 

I don't know all the logistics of the situation, but here's what I do know - I had to dismember the entire thing, peel off glue from each and every ball, and start all over. I had used the shatter-proof balls, thank goodness, but now bunches of the balls had bald spots on them from where the cheap paint and glitter had come off with the glue. It was like a giant puzzle reassembling that thing to make sure not too many of the bald spots showed. The first go around was crafting fun, this go around was a huge crafting nuisance.

But this time I wasn't messing around. I used an entire tube of E6000 on that sucker. Take that, Wreath! I may have just killed a million brain cells by way of E6000, the most toxic glue in all the land, but I HAVE CONQUERED YOU!


Look at you, Wreath, sitting there all beautiful and colorful and sparkly and acting like you weren't a complete pain in the butt. 


 You're lucky you were worth it.


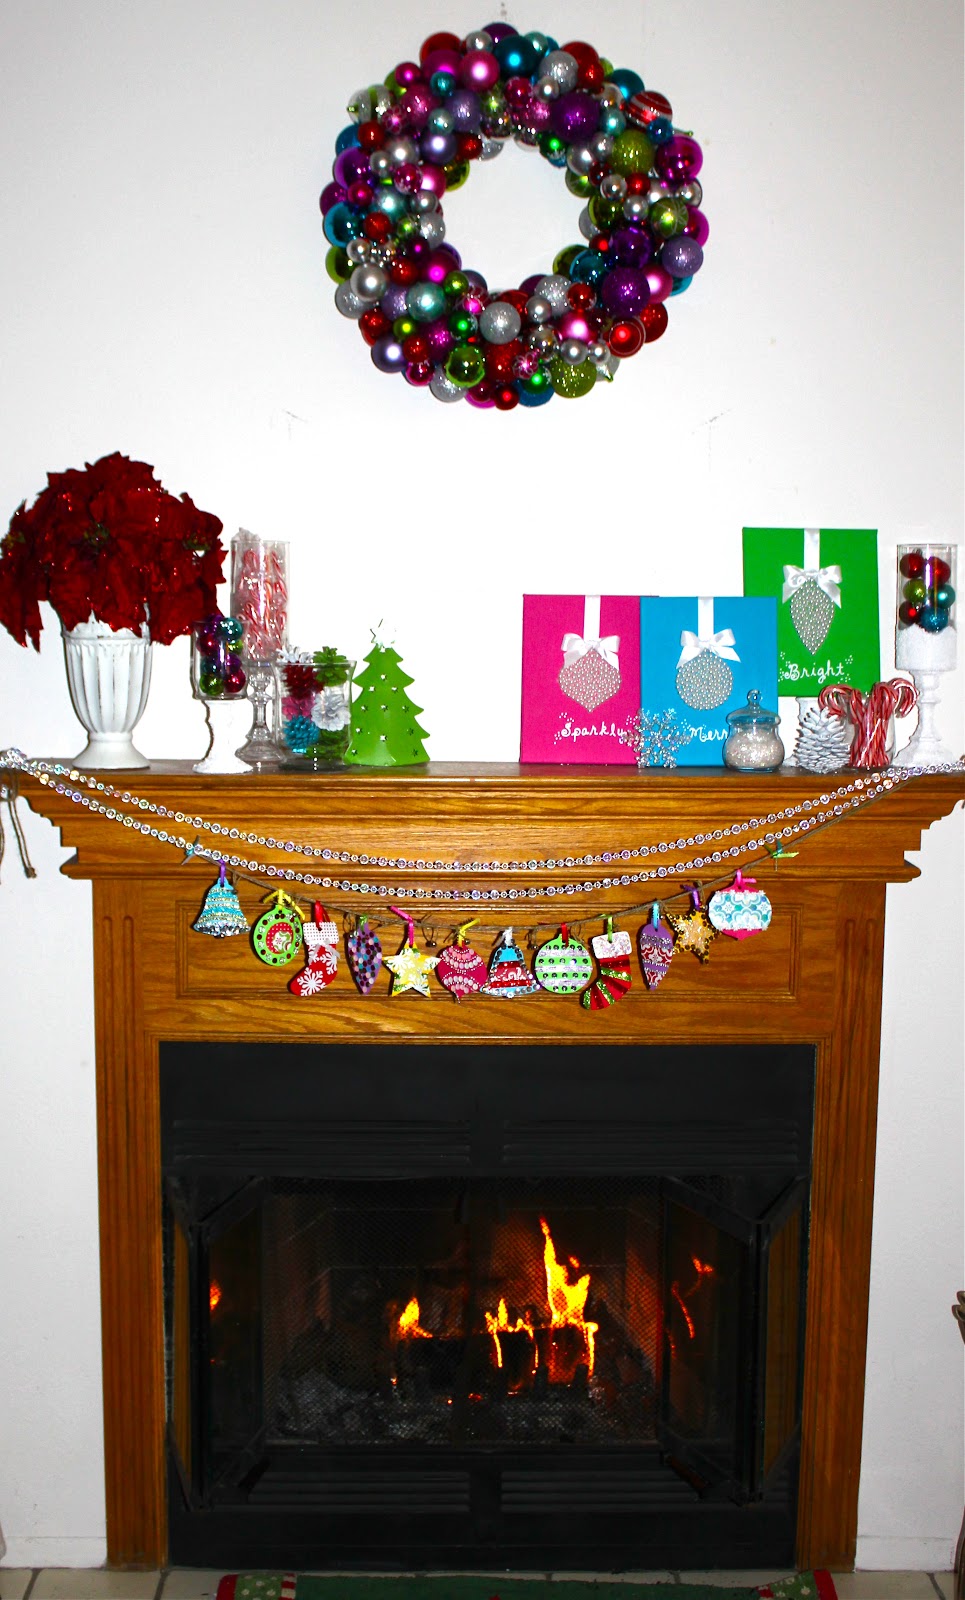
So worth it, in fact, that you earned yourself a sparkly, silvery ribbon. 


Oh, Fancy Wreath, I can't be mad at you, you are too beautiful! 

And... 

I'm done. 

That's right. I said it.

Hear that, Crafting Gods? DO YA? 

Anyway....


Merry Christmas, my friends!


Saturday, December 17, 2011

Epsom Salt Snow - Part 2

So last post I told you about how I made a bunch of these snowy candle holders with my new favorite snow substitute.

AND THEN!!! I got some of my favorite candlesticks from The Dollar Tree. I also grabbed a taller candlestick that I had already glued to a cylinder vase. I covered the top in a piece of plastic tablecloth that I cut to (hopefully) look like snow drifts when all was said and done. 


I spray painted them all white in my personal paint booth. Yes. It is a cardboard box. I'm so fancy!!!


Wintery white!


I coated the candlesticks with a nice layer of Mod Podge. And then I covered those suckers with Espom salt. I'm not gonna lie, after it all dries, the salt falls off like crazy if you touch it. It even falls off a little if you glance in its general direction. It's totally worth it to me, because it's so pretty.


Then I attached some pretty Dollar Tree vases to the candlesticks with Gorilla Glue, just like I did here.


Filled with big colorful jingle bells...


And sparkly garland....


And, hey! That one does kind of look like it's covered in snow drifts!


Way to rock it out, Epsom salt.


Saturday, December 10, 2011

Epsom Salt Snow - Part 1

So I never knew that Epsom Salt looked like snow. Did you?

I actually had no idea what it looked like at all because I had never seen it before. But you learn something new every day. Especially when you're cruising around the enchanting world of pinterest.

Epsom Salt, Epsom Salt, Epsom Salt! I want to do stuff with it!

And it turns out that Epsom salt is super cheap. I bought a big bag of it for less than four bucks. That is definitely the kind of crafting supply I can appreciate.

So I got a Ball jar.


I hot glued three different layers of burlap/ribbon/ribbon around it.


I tied on a couple jingle bells.


And I filled it with Epsom salt and a white candle. 


And then I made a bunch more because they are adorable! I even made a couple extra to give to my kids' teachers for Christmas gifts.


I got this little "is liiiike" silver platter at The Dollar Tree. I poured on a bunch of the Epsom salt to make it extra wintery and I was planning on adding some Christmas tree sprigs to give it an extra pop of color. 


But my kids Could Not Stop Playing With The Fake Snow. They kept pinching it up in their little fingers and sprinkling it where it didn't belong. Epsom Salt was everywhere! On the table, on the floor, on the couch, fake-flocked onto the little decorative Christmas tree I had just bought. Sorry candles, no more snow-covered platter for you! 


Much better.


And so pretty!


Good stuff, right?


Saturday, December 3, 2011

Pretty Ornament Art

I saw this on pinterest. Why, yes. Yes I can. (*update - oooh - that's a bummer - it's not there anymore. Maybe I should start claiming that I made this up with my very own brain. But... I didn't. Someone made a Christmas card that became my ornament art inspiration. Moving on...)  

So I cut out some ornament shapes. 

I used bauble shapes from my Christmas Ornament Banner Kit  (that's why they have the holes). But you can do any shape that makes you happy. 

Even with a perfectly symmetrical printed out version of the shapes, I still folded them in half before I cut them. I mean, I am a grown-up and everything, and I've had my share of scissor usage, but I guaran-darn-tee you, if I didn't fold these suckers in half, they would have been really uneven.


I picked up a jumbo pack of ten 8"x10" canvases at Michael's when they were on sale.

I painted three of them - pink, blue, and green. Because those are my Christmas colors! Geez! I also throw lots of red and white into the mix, but for this project, I wanted my colors on the super happy side.

I traced my ornaments.


With pencil. Unevenly. You got something to say? Huh? Do ya?


And then I smothered the entire ornament shape with Tacky Glue. Aleene's in the gold bottle. It's my favorite and I use it in all my craft kits.


Then I got some beads. After all three ornaments, this is how many beads I still have left. Excellent!


I randomly poured on some of the bigger beads.


And then I added more and more and made a nice even-ish outline around the outside of the ornament. 


Then I poured on some of the smaller beads. Some find their home right away. Others sit there at the top, like so:


If you use your finger to make them find their homes, it will just push the bigger ones out to make room. Then your bead outline will get messed up. A mechanical pencil (with no lead showing) worked for me. Go to your home, Bead!


Beads in their homes.


I let it all dry. 


I glue gunned some ribbon to the top of the ornament and up around the top of the canvas.


And then I learned how to make The Perfect Bow. Which is an entire craft feat in itself. I asked Google and Google said, No way, man, perfect bows are rough. Oh, wait, you're not five years old? That's embarrassing. You should probably check out this link

And that's when Martha Stewart showed me the way. 

Maybe you have always known how to create The Perfect Bow. Not me. Up until now, when a situation called for a nice looking bow, I would make the only kind I knew how to make. You know. The kind I learned how to make when I was five. For shoelace-tying purposes. Even as a grown-up, if I needed a bow, I would tie that old school one, try to make it look nice, get frustrated, say, "'F' it," and move on with my life. 

But now! Now I know! Look at the perfection!


Then I used a white paint pen...  wait for it...

to write some ... wait for it...

WORDS IN THE HOME!

You know that I'm usually against them, but I think, for me, they make holidays more fun. After the holidays, though, watch out!

They mostly come at the holidays...mostly. (Get it? Get it? Word Aliens!)


Sparkly. Merry. Bright. Oh, my.


I want to find some pretty white frames for them, but in the meantime...


Up on my mantel they go. 


Happy 'Words In The Home' Season!


LinkWithin

Related Posts Plugin for WordPress, Blogger...